• หน้าแรก
  • หลักสูตร
  • บทความ
  • ร้านค้า
  • ติดต่อเรา
    มีคำถามเกี่ยวกับ odoo ?
    (02) 4302475
    info@odoothaidev.com
    Login
    Odoothaidev - We are Odoo professional in Thailand
    • หน้าแรก
    • หลักสูตร
    • บทความ
    • ร้านค้า
    • ติดต่อเรา

      iReport

      • บ้าน
      • บล็อก
      • iReport
      • How to create a report in jasper ireport

      How to create a report in jasper ireport

      • โพสโดย admin
      • หมวดหมู่ iReport, Jasper Server & Server, Reporting ระบบรายงาน
      • วันที่ กันยายน 9, 2019

      In this article I will show you how to create jasper report from scratch.

      1- Open Jaspersoft iReport Designer and click on File>>New, and select blank A4 report.

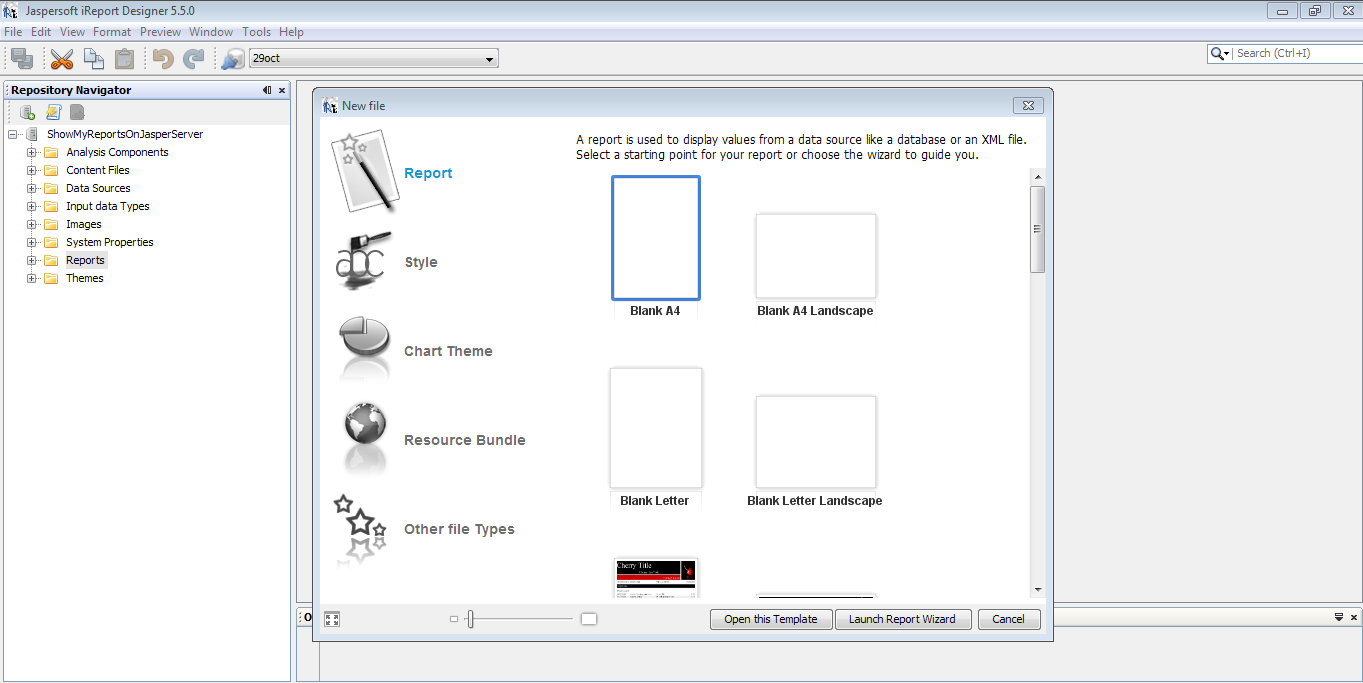
      2- Now click on “Open this template” button, a dialog box will open. On this interface give name of your report and click “Next” and than “Finish” button.

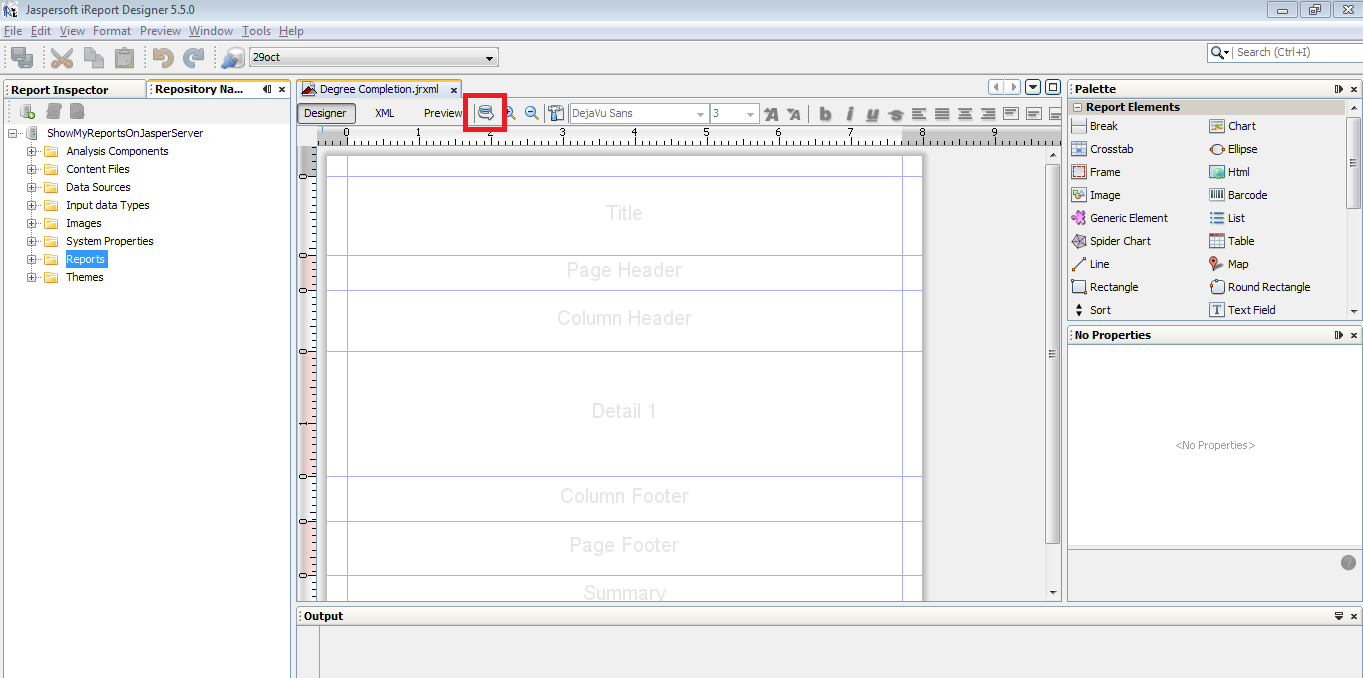
      3- After clicking on finish button you will see below screen. Now click on highlighted button to add query for your report.

      4- In report query dialog box select Query Language as SQL and add your query and click “Ok”.

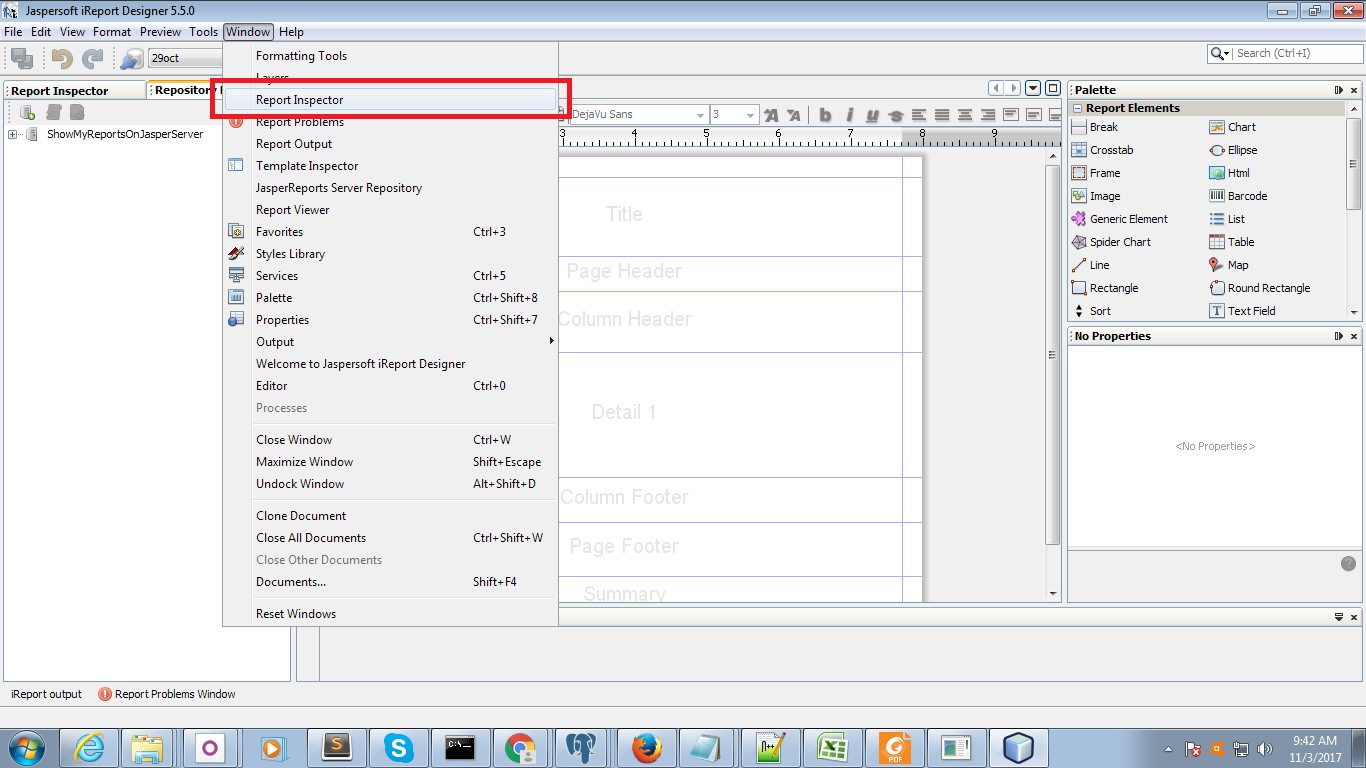
      5- Now go to “Report Inspector” tab located in left pane of the window. If this tab is not visible in your window, than click on “Window” menu from top and add “Report Inspector” by yourself.

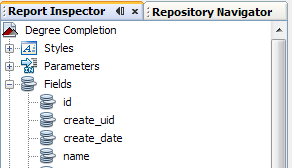
      6- Expand “Fields” under Report Inspector tab, here you will see your selected query fields/table columns.

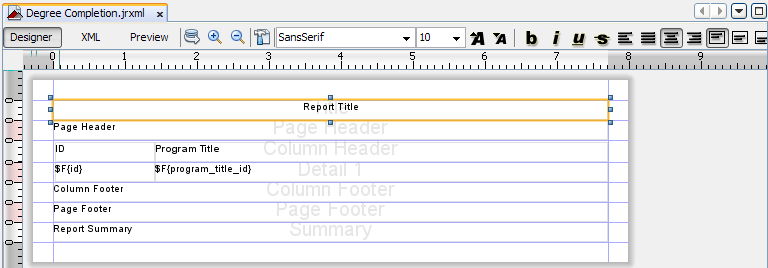
      Before going to create our report in jasper first we discussed design view. Design view has following bands.
      Title — your report title goes here, and this title would be visible only first page of the report.
      Page Header — if your report has ten pages than page header would be visible on each page of your report.
      Column Header — is the name of your table fields or column, when you add fields in detail band than column header will be automatically added in this band.
      Detail — fields of your table goes here as a detail of your report
      Column Footer — in this band you will add sum of integer fields, number of count etc as per your report need
      Page Footer — this band display your page number, date etc
      Summary — this band display your report data in tabular form or in a graph (pie chart, bar chart, graph etc format)


      Title

      You can add dynamic as well as static title for your report, for static text title drag drop “Static Text” in Title band from palette pane located on right side of the window. If you don’t see this pane than go to “Window” menu and add “Palette” or press Ctrl+shit+8 on windows environment. Adjust its width and height, font size, formatting etc according to your need. For dynamic title drag and drop your field from Report Inspector pane.

      Page Header

      You can add your page header similarly as we have done in case of title. Remember page header will display each and every page of your report.

      Detail and Column Header

      Detail band is the most important band of your report, because it contains most of your report data in tabular form. To show data in repeated form you need to drag and drop table column/ fields into this band. When you add fields to this band its heading automatically goes to the column header band here by double clicking you can easily modify your column heading.

      Column Footer

      Mostly this band is used to display calculations. For example in my report I have a price column and we want to show total price at the end, than we need column footer.

      Page Footer

      As I told you earlier this band holds your number of pages, current date etc.

      Report Summary

      Used to display the summary of your report in graphic,tabular,charts et format.

      In this article we created a simple report just your understanding, In my next post I will discuss different properties with example.

      https://www.youtube.com/watch?v=3zyAa-Cvghs
      • Share:
      อวตารของผู้เขียน
      admin

      โพสต์ก่อนหน้า

      How to add serial number in jasper ireport
      กันยายน 9, 2019

      โพสต์ถัดไป

      How to add report datasource in ireport designer
      กันยายน 9, 2019

      คุณอาจชอบ

      ตัวอย่างเอกสารจาก Odoo
      11 กันยายน, 2021
      ตัวอย่างเอกสาร Odoo
      21 มีนาคม, 2020
      ตัวอย่างเอกสารจากระบบ Odoo
      21 มีนาคม, 2020

      ค้นหาบทความ

      หมวดหมู่

      หมวดหมู่

      • Accounting
      • Adobe XD
      • API
      • Blog
      • Business
      • Buttons
      • CRM
      • Custom Fields
      • Design / Branding
      • Django
      • Ecommerce
      • ERP
      • ERP Flow
      • Express
      • Flectra
      • Form View
      • Frontend
      • Github
      • Github
      • Grant Chart
      • Header
      • iReport
      • Jasper Server & Server
      • Jaspersoft Studio
      • Java
      • JSON-RPC
      • Lazada
      • Linux
      • MLM
      • MRP
      • Nignx Proxy
      • NodeJS
      • Odoo 10
      • Odoo 12 Module
      • Odoo 13
      • Odoo 14 Development
      • Odoo 16
      • Odoo 8
      • Odoo 9
      • Odoo API
      • Odoo Certification
      • Odoo Developer
      • Odoo Ebook
      • Odoo Enterprise
      • Odoo ERP
      • Odoo Event
      • Odoo Implement
      • Odoo Inventory
      • Odoo Report
      • Odoo V15
      • Open Source
      • Open-office
      • OpenERP 7.0
      • PhantomJS
      • Postgres SQL
      • Programming Language
      • Project Management
      • Python
      • Python3
      • Qweb
      • Reporting ระบบรายงาน
      • RML Report
      • Search View and Filters
      • Social Network
      • Statusbar
      • Ubuntu
      • Uncategorized
      • Voip & Call Center
      • Warehouse Management
      • WMS
      • Woocommerce
      • Workflow
      • XML-RPC
      • การ Implement
      • การเก็บข้อมูล Pre-Requirement
      • การเตรียมตัวเพื่อใช้งาน erp
      • ความรู้ด้านการตลาด CRM
      • ธีมเว็บไซต์ Odoo
      • ธุรกิจบริการ
      • ธุรกิจประเภทจัดอบรมสัมมนา
      • ธุรกิจสิ่งพิมพ์
      • นักพัฒนา
      • ประเภทธุรกิจที่เหมาะกับ Odoo
      • ระบบบัญชี
      • ระบบเคลม
      • ลิขสิทธิ์ – License
      Introduction LearnPress – LMS plugin

      Introduction LearnPress – LMS plugin

      Free
      From Zero to Hero with Nodejs

      From Zero to Hero with Nodejs

      Free
      Learn Python – Interactive Python

      Learn Python – Interactive Python

      $69.00

      บทความล่าสุด

      V16 Planned Date of Tasks are invisible.
      12ก.พ.2023
      Odoo Implement Methodology
      29พ.ย.2022
      Odoo Enterprise Subscription Agreement
      29พ.ย.2022
      (02) 430-2475
      info@odoothaidev.com
      Facebook Twitter Google-plus Pinterest

      Odoothaidev by OdooTeaM.

      • Privacy
      • Terms
      • Sitemap
      • Purchase

      เข้าสู่ระบบด้วยบัญชีเว็บไซต์ของคุณ

      ลืมรหัสผ่าน?

      Click to Copy